
In the world of modern business, understanding user behavior on your website is crucial for optimizing engagement and driving success. Salesforce Experience Cloud offers a powerful solution to track user interactions and gain valuable insights through Google Analytics 4 integration. In this blog post, we’ll explore how you can leverage this integration to enhance your Lightning Web Runtime (LWR) site and make data-driven decisions.
Integration Steps in Experience Builder
Let’s now walk through the steps to integrate Google Analytics 4 into your Experience Cloud site using the Experience Builder:
- Navigate to Settings in Experience Builder.
- Select Integrations.
- Choose Google Analytics 4 and click “Add to Site.”
- Input your Google Analytics Measurement ID and save the changes.
- Publish the site.
Following these steps, Google Analytics will commence tracking user engagement as soon as the site is published. If at any point you wish to halt tracking, you can simply remove the integration from the site. It’s important to note that existing data in your Google Analytics account will remain accessible even after the integration is removed.
Changing the Measurement ID for Google Analytics
Should you need to modify the Google Analytics Measurement ID, it’s a straightforward process:
- Return to the Integrations page in Experience Builder.
- Locate the Google Analytics 4 section and click “Edit.”
- Enter the new Measurement ID.
- Publish the site.
Custom GA4 Integration in Aura or LWR Sites (With User Tracking)
When the need arises to delve deeper into user-specific data within your Google Analytics 4 (GA4) integration, or to establish user tracking in a Lightning Web Rollup (LWR) site, this uncomplicated yet potent example provides a clear roadmap to navigate the solution.
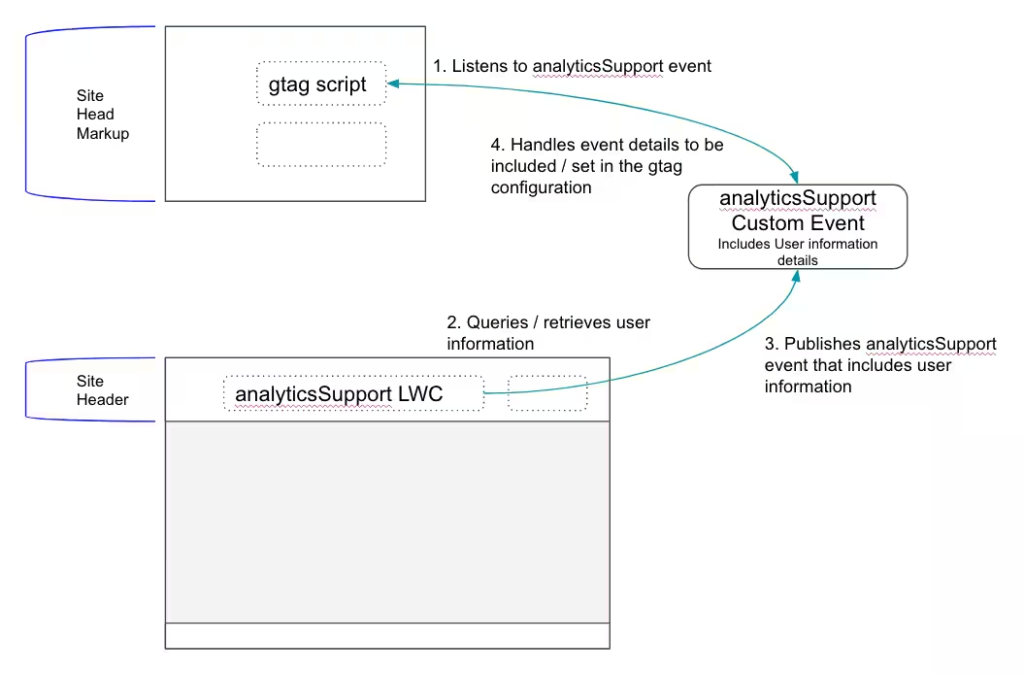
At a glance, this method veers away from the conventional out-of-the-box configuration options available within Experience Builder. Instead, it invites you to take the reins by seamlessly embedding Google Analytics’ “gtag” script directly into your site’s head markup. Moreover, the journey involves crafting a modest yet purposeful custom Lightning Web Component named “analyticsSupport,” seamlessly integrated into your site’s header region.
This custom component ingeniously retrieves user-specific details such as their unique ID, user type (guest or authenticated), and any specialized categorizations demanded by your setup. Subsequently, these gathered user details are encased within a Javascript object and channeled through a bespoke event. This event is then expertly managed by a dedicated listener nestled within the “gtag” script’s head markup. The holistic solution culminates in a harmonious ensemble, akin to the following schematic:
Let’s venture into the solution’s inner workings for a more comprehensive understanding.
Creating the Custom analyticsSupport Lightning Web Component
As previously alluded, the core objective behind the “analyticsSupport” Lightning Web Component is to seamlessly retrieve user-centric data and relay these specifics via a tailor-made event. Since the solution operates independently of rendering UI components, the HTML file within the component remains a blank slate. It is the component’s Javascript file, “analyticsSupport.js,” that takes the spotlight, encompassing most of the operational logic.
import { LightningElement } from 'lwc';
import Id from '@salesforce/user/Id'; // Fetches the ID of the running user
import isGuest from '@salesforce/user/isGuest'; // Returns true for unauthenticated users, false otherwise

export default class AnalyticsSupport extends LightningElement {
    connectedCallback() {
        // Create a payload object following GA4 documentation structure
        let payload = {
            detail: {
                'user_id': Id,
                'user_properties': {
                    'user_id': Id,
                    'user_type': (isGuest) ? 'Unauthenticated' : 'Authenticated',
                    'account_rating': 'Silver'
                }
            }
        };
        // Dispatch custom event for the head markup listener to handle
        document.dispatchEvent(new CustomEvent('analyticsSupport', payload));
    }
}
Component Configuration: analyticsSupport.js-meta.xml
To ensure seamless integration, the component’s configuration is essential. The “analyticsSupport.js-meta.xml” file serves this purpose, featuring vital configuration tags and targets. This enables the component to be effortlessly dragged and dropped into your site’s header region via Experience Builder’s Components panel.
<?xml version="1.0" encoding="UTF-8"?>
<LightningComponentBundle xmlns="http://soap.sforce.com/2006/04/metadata">
    <apiVersion>55.0</apiVersion>
    <isExposed>true</isExposed>
    <masterLabel>Analytics Support</masterLabel>
    <targets>
        <target>lightningCommunity__Page</target>
        <target>lightningCommunity__Default</target>
    </targets>
</LightningComponentBundle>
Configuring the Global Site Tag Script
The journey includes adding Google Analytics’ global site tag script to your site’s head markup. Following Google Analytics documentation.
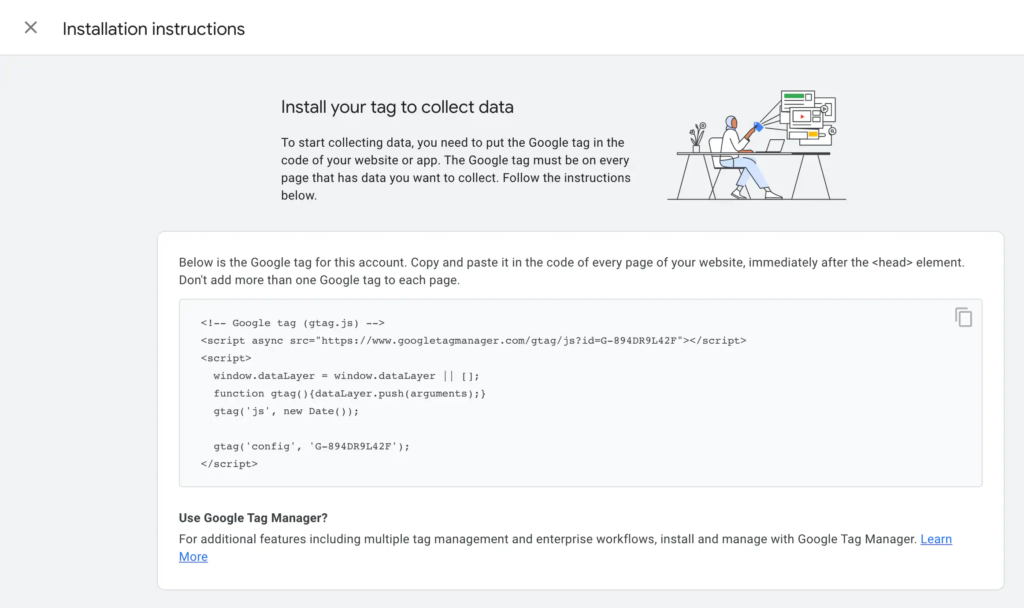
you’ll seamlessly integrate this script, laying the foundation for robust data collection.
Once the script is copied, proceed to Experience Builder’s Settings → Advanced → Edit Head Markup option to seamlessly embed the script into your site.
Subsequently, to enable seamless communication between the developed “analyticsSupport” component and the embedded script, employ an event listener. This listener expertly handles the custom event triggered by the component.
<script>
  window.dataLayer = window.dataLayer || [];
  function gtag(){dataLayer.push(arguments);}
  gtag('js', new Date());

  //gtag('config', 'G-WVFY7QZGJH');

  //custom event listener to handle the analyticsSupport event with
  //the user information from the LWC
  document.addEventListener('analyticsSupport', function(e) {
      //get the details of the event and parse into an object
      let detail = JSON.parse(JSON.stringify(e.detail));
      //set the gtag config with the proper G- measurement ID and
      //the detail object containing the user properties and user id
      gtag('config', 'G-WVFY7QZGJH', detail);
  });
</script>
With the configuration in place, your analytics journey is poised to flourish. Witness the seamless flow of traffic data to Google Analytics, with the screenshot showcasing how the user ID and properties from the Lightning web component are adeptly tracked.
As you traverse this orchestrated solution, remember that it serves as a foundation upon which you can tailor and adapt the integration according to your distinct requirements. With each element meticulously crafted, you embark on a journey that not only empowers user-specific insights but propels your site’s analytics prowess to new heights.
Making Google Analytics Work: Handling Content Security Policy (CSP) and Allowed Hosts
Just like inviting a guest into your home, allowing Google Analytics to run smoothly on your site requires a bit of preparation. This involves handling Content Security Policy (CSP) settings and adding allowed hosts to ensure everything operates without a hitch.
Step 1: Setting Up Content Security Policy
Think of CSP as your site’s security bouncer. To make Google Analytics work, you need to tell this bouncer to be a bit more lenient. In Experience Builder, follow these simple steps:
- Go to Settings → Security & Privacy.
- Choose the “Relaxed CSP: Permit Access to Inline Scripts and Allowed Hosts” security level.
This relaxed setting lets Google Analytics scripts do their job while maintaining security.
Step 2: Adding Trusted Domains
Imagine trusted friends at a party. You need to ensure that Google Analytics and your site get along smoothly. This involves adding Google Analytics’ domains to the “trusted sites” list:
- If these domains are not already on the list, simply click “Add Trusted Site.”
- This harmonious addition ensures that Google Analytics and your site understand each other better.
Bonus Step: Double-Check Your Setup
Even though Google Analytics usually plays nice with the default settings, it’s always a good idea to be thorough. This is especially true if you’re customizing things a bit.
- Make sure the domains you’re working with are allowed in both the CSP settings and Salesforce Setup.
- This double-check helps you catch any potential issues before they cause any trouble.
By following these simple steps, you’ll be able to enjoy the benefits of Google Analytics on your site without any hiccups. It’s like making sure your guests have a good time while keeping your security guards happy!